Integrating the 3D Nurse Inflated Tumbler Warp into Your Sublimation Workflow
In the competitive landscape of custom merchandise, efficiency and visual impact are the twin pillars of success. For creators specializing in healthcare-themed apparel and drinkware, the 3D Nurse Inflated Tumbler Warp represents more than just a graphic asset; it is a strategic tool designed to streamline the production pipeline. Whether you are a small business owner managing inventory or a freelance designer handling multiple client orders, understanding how to effectively implement this digital download can significantly reduce turnaround time while maintaining high aesthetic standards.
This article explores the practical application of the 3D Nurse Inflated Tumbler Wrap PNG, detailing how it fits into broader sublimation workflows, ensuring compatibility with various hardware, and maximizing the value of your digital assets.
Understanding the Asset and Its Role in Production
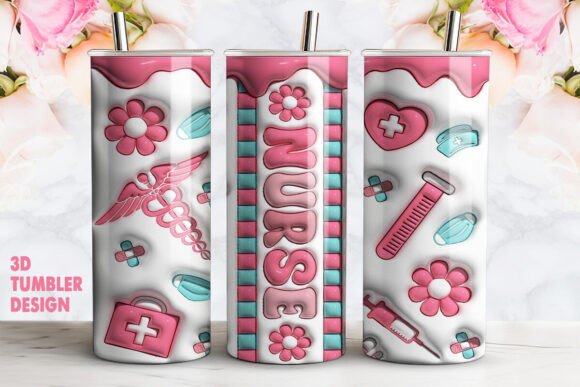
The core of this product is a high-resolution, pre-warped design specifically engineered for 20oz skinny tumblers. Unlike flat images that require manual distortion to fit curved surfaces, the 3D Nurse Inflated Tumbler Warp comes pre-adjusted. This distinction is critical for workflow optimization. By eliminating the need for complex Photoshop manipulations or third-party warping software, you reduce the potential for human error and save valuable minutes per unit.
The design features a "inflated" or balloon-style aesthetic, which has gained traction in modern graphic trends for its playful yet professional appearance. It appeals directly to nurses, nursing students, and healthcare administrators looking for personalized items that stand out from generic text-based mugs. The inclusion of a 300dpi PNG file ensures that when printed, the edges remain crisp, and the colors stay vibrant, which is essential for maintaining brand reputation and customer satisfaction.
Pre-Production: Preparation and Compatibility Checks
Before initiating any print job, proper preparation is key to avoiding costly material waste. The 3D Tumbler Design Skinny Sublimation Digital Download is optimized for specific dimensions, typically 9.3 x 8.2 inches for the 20oz straight tumbler wrap. However, relying solely on these numbers without verifying your specific hardware settings can lead to misalignment.
- Printer Calibration: Ensure your sublimation printer is calibrated for color accuracy. Since colors may vary slightly due to differences in computer screens, printing a test swatch on standard paper can help you adjust saturation levels before committing to expensive sublimation paper.
- Software Setup: While the file is pre-warped, you must ensure your design software (such as Photoshop, Illustrator, or Silhouette Studio) is set to the correct DPI (300) and color profile (sRGB or Adobe RGB, depending on your printer’s recommendation).
- Material Selection: Use high-quality sublimation blanks. The "inflated" effect relies on smooth gradients and clear lines; low-coating tumblers may result in dull colors or ghosting, undermining the 3D illusion.
By treating the digital file as a precise component in a larger mechanical process, you ensure consistency across batches. This is particularly important for bulk orders where uniformity is expected.
Execution: Integrating the Wrap into Your Workflow
Once the preparatory steps are complete, the actual implementation of the 3D Nurse Inflated Tumbler Warp is straightforward but requires attention to detail. The process generally follows a linear path: import, position, print, and press.
Importing and Positioning
Open your design software and import the PNG file. Because this is a Summer Tumbler Wrap style design, it likely features bright, engaging colors. Place the image on your canvas, ensuring that the dimensions match the 9.3 x 8.2-inch specification. If you are also utilizing the included 11oz mug wrap, note that this is a separate asset requiring different dimensions. Do not attempt to stretch the tumbler wrap to fit a mug, as this will distort the 3D effect and reduce print quality.
Printing and Heat Press Settings
Print the design on sublimation paper using mirror mode if required by your specific heat press method (though most tumbler presses do not require mirroring if the paper is wrapped correctly). Secure the printed wrap around the 20oz skinny tumbler using heat-resistant tape. Ensure there are no gaps or wrinkles, as these will create white lines or blurs in the final product.
Set your heat press according to the manufacturer’s guidelines for your specific tumbler brand. Typically, this involves temperatures around 380°F (193°C) for 150–180 seconds. The High-Quality 300dpi PNG ensures that even under high heat, the intricate details of the nurse-themed graphics remain sharp.
Post-Production: Quality Control and Long-Term Use
After the pressing cycle is complete and the tumbler has cooled, remove the paper and inspect the product. The 3D Nurse Inflated Tumbler Warp should appear seamless, with the "inflated" elements looking three-dimensional against the background. Check for any banding in the gradients or color shifts. If issues arise, revisit your printer calibration or heat press timing rather than assuming the digital file is at fault.
For long-term use, store the original PNG files in an organized digital library. Tag them with relevant keywords such as "nurse," "healthcare," "summer," and "20oz skinny" to facilitate quick retrieval for future orders. This organizational habit supports scalability, allowing you to respond rapidly to seasonal demands or trending topics in the nursing community.
Expanding Your Product Line with Complementary Assets
The versatility of this digital download extends beyond the tumbler itself. The package includes an 11oz mug wrap, allowing you to offer bundled products. A nurse might purchase a tumbler for their shift and a matching mug for home use. By leveraging both assets, you increase the average order value without significant additional design effort.
Furthermore, consider how this design interacts with other marketing channels. Use high-resolution mockups of the 3D Sublimation Design in your online store listings. Show the product in context—on a desk, in a hospital breakroom, or alongside other medical accessories. This helps customers visualize the end result, reducing hesitation and potential returns.
Practical Tips for Consistency and Efficiency
- Batch Processing: If you have multiple orders for the same design, print several sheets at once. This reduces the frequency of printer head cleaning cycles and saves ink.
- Standardize Your Settings: Create a template in your design software with the exact dimensions for the 20oz skinny tumbler. This eliminates the need to resize or check measurements for every new project.
- Monitor Screen Calibration: Since colors shown may vary slightly due to differences in computer screens, invest in a monitor calibrator. This ensures that what you see on screen closely matches the printed output, minimizing surprises.
- Customer Communication: Clearly state in your product descriptions that the item is a sublimated product, which means the design is dyed into the coating and will not peel or crack. This educates the buyer and sets realistic expectations regarding durability.
Conclusion
The 3D Nurse Inflated Tumbler Warp is a powerful asset for anyone involved in the sublimation business. By integrating this pre-warped, high-resolution PNG into your workflow, you eliminate technical bottlenecks and focus on what matters most: producing high-quality, appealing products for your customers. From careful pre-production checks to efficient printing and thoughtful post-production organization, each step contributes to a smoother, more profitable operation. Embrace these practical strategies to enhance your creative process and deliver consistent value to the healthcare professionals who appreciate your work.