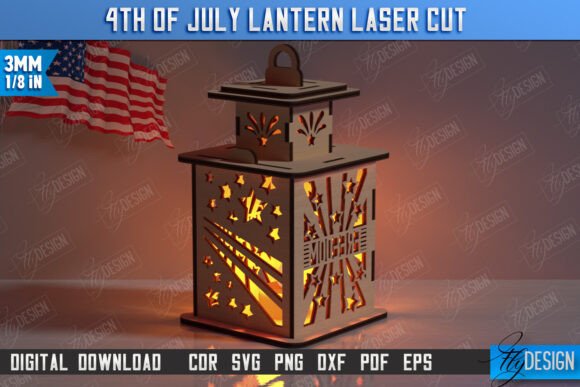
4th of July Lantern Laser Cut CNC File: A Guide to Flawless Patriotic Projects
Celebrating Independence Day with handmade decor adds a personal touch that store-bought items simply cannot match. The 4th of July Lantern Laser Cut CNC File offers creators a pathway to producing stunning, three-dimensional patriotic displays. Whether you are a hobbyist looking to decorate your porch or a small business owner preparing inventory for summer markets, this digital asset provides the foundation for professional-quality results. However, the difference between a warped, unusable prototype and a crisp, glowing lantern often lies in how you handle the digital files before they ever reach your machine.
Many users dive into laser cutting with enthusiasm but overlook the technical nuances of file compatibility and material preparation. Understanding these details is not just about following instructions; it is about protecting your time, materials, and equipment. By addressing common pitfalls early, you ensure that your 4th of July Lantern Laser Cut Patriotic Design 3D Lantern Independence Day CNC File performs exactly as intended.
Understanding the File Structure and Compatibility
One of the most frequent misunderstandings involves the variety of file formats included in digital downloads. This product arrives as a zip archive containing SVG, EPS, PNG, PDF, and DXF files. While it might be tempting to grab the first file your software opens, choosing the wrong format can lead to significant dimensional errors.
For instance, many creators prefer Scalable Vector Graphics (SVG) for their versatility. However, if you are using Lightburn, a popular laser control software, you may encounter distortion issues. SVG files can sometimes interpret units differently depending on the software’s default settings, leading to lanterns that are either too small to hold a light source or too large for your material bed. To avoid this frustration, experienced users recommend utilizing the DXF file format when working with Lightburn. DXF files tend to maintain strict dimensional accuracy, ensuring that the tabs, slots, and overall structure fit together perfectly without manual adjustment.
Before you begin, verify that your cutting machine and software are compatible with these standard vector formats. If you are unsure, test a small section of the design on scrap material. This simple step can save you from wasting expensive acrylic or wood sheets on a misaligned cut.
The Critical Importance of Line Color Interpretation
A seemingly minor detail that causes major headaches is the interpretation of line colors within the design file. In this specific 4th of July Lantern Laser Cut CNC File, the creator has established a clear protocol: RED lines indicate CUT paths, while BLACK lines indicate ENGRAVE areas. Ignoring this distinction can result in a lantern that is either partially cut through where it should remain solid, or engraved where it should be separated.
Common mistakes include importing the file into software that automatically assigns default power and speed settings to all vectors, regardless of color. If your machine cuts along the black engraving lines, you may weaken the structural integrity of the lantern panels. Conversely, if it only engraves the red cut lines, you will be left with a solid sheet rather than assembled pieces. Always double-check your layer settings in your CAM software. Assign distinct power and speed parameters to the red and black layers explicitly. This ensures the laser burns deeply enough to sever the material on red lines while merely marking the surface on black lines.
Material Selection and Assembly Realities
Even with perfect file handling, the choice of material plays a pivotal role in the final outcome. This 3D lantern design relies on interlocking tabs and slots. If you use material that is too thick, the pieces will not fit together, requiring excessive force that can crack the wood or acrylic. If the material is too thin, the lantern may feel flimsy and fail to stand upright.
Beginners often overlook the kerf—the width of the material removed by the laser beam. Depending on your lens and material, the kerf can vary. If your fits are too tight, consider adjusting the offset in your software or sanding the tabs slightly. For a smoother assembly experience, test-fit one panel before committing to cutting the entire set. This proactive approach allows you to make minor adjustments to your focus or speed settings before processing the full batch.
Maximizing Value Through Customization
This digital product is designed to be flexible, yet many users stick rigidly to the default settings. The inclusion of PNG files offers opportunities for those who may want to print the design instead of cutting it, or use it for sublimation projects. If you require a different color scheme or size for the PNG file, reaching out to the seller can yield customized assets that better suit your specific marketing or decorative needs.
For entrepreneurs, this adaptability is crucial. You might want to create a larger version for outdoor display or a smaller version for table centerpieces. Before scaling the vector files, ensure that the proportions remain consistent. Distorting the aspect ratio can misalign the interlocking mechanisms, rendering the design unusable. Always scale uniformly and re-check the dimensions against your material thickness.
Best Practices for a Successful Project
To ensure your project runs smoothly, follow these practical steps:
- Verify File Integrity: Open each file type in your preferred software before starting the job to ensure no data corruption occurred during download.
- Prioritize DXF for Precision: As noted, use the DXF file if you are using Lightburn to avoid dimension distortion common with SVGs.
- Respect the Color Code: Strictly adhere to the red-for-cut and black-for-engrave rule to maintain structural integrity.
- Test on Scrap: Always run a test cut on a spare piece of the same material to dial in your power, speed, and focus settings.
- Communicate with the Creator: If you have specific needs regarding file types or PNG variations, send a message. Most designers are willing to help ensure your success.
By approaching the 4th of July Lantern Laser Cut CNC File with attention to technical detail and material science, you transform a simple digital download into a high-quality physical product. Whether you are creating gifts for family or products for your shop, these precautions ensure that your independence day decorations shine brightly and stand sturdy. Follow the designer to stay updated on future releases, and do not hesitate to ask questions if you encounter unique challenges with your setup. Happy cutting!